Activity 18: Research HTML

Instructions:
Basic HTML Elements:
Write an HTML document and use the following:
Headings: Add headings like <h1>, <h2>, <h3>, etc.
Paragraph: Use <p> for text blocks.
Lists:
Unordered List: Use <ul> for bullet points.
Ordered List: Use <ol> for numbered lists.
Table: Add a table with <table>, <tr>, <th>, and <td>.
Form
Div
Images
canvas
video
youtube
drag and drop
Semantic HTML:
- Use meaningful tags like <header>, <footer>, <article>, <section>, and <nav> to organize your web page.
Task:
Practice on your machine and document your code on hashnode.
Deadline: Oct 4
Remember the following text:
No CSS, just HTML.
index.html:
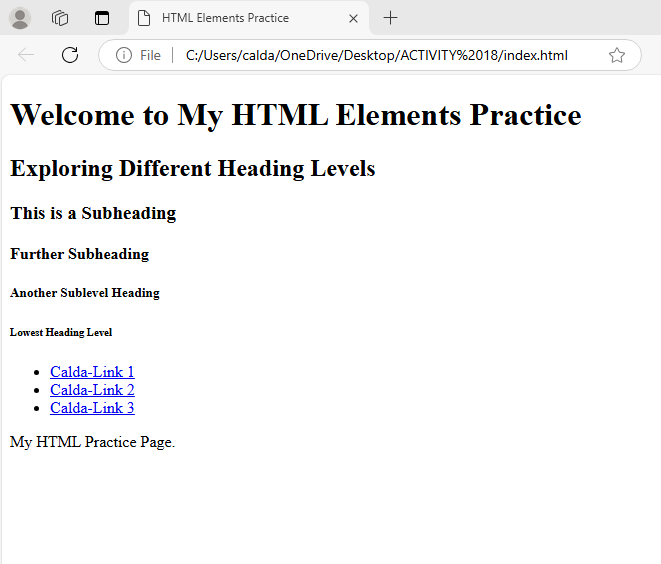
<!DOCTYPE html>:- This declaration indicates that the document is an HTML5 document, which helps browsers render the content correctly.
<html lang="en">:- The
<html>tag is the root element of the HTML document, and thelangattribute specifies that the language of the document is English (en). This is important for accessibility tools and search engines.
- The
<head>Section:Contains meta-information about the document.
<meta charset="UTF-8">: Specifies the character encoding, allowing for a wide range of characters.<meta name="viewport" content="width=device-width, initial-scale=1.0">: Ensures the page is responsive and scales properly on different devices.<title>HTML Elements Practice</title>: Sets the title of the document, which appears in the browser tab.
<body>Section:- Contains the main content of the document that will be displayed in the browser.
<header>:This section includes introductory content or navigational links.
Headings: Multiple heading levels are used to demonstrate the hierarchy of content.
<h1>Welcome to My HTML Elements Practice</h1>: The main title of the document.<h2>to<h6>: Subheadings that demonstrate the various heading levels in HTML, showing how they create a structure for the document.
<nav>:- This section contains navigation links that allow users to navigate to other pages. It includes an unordered list (
<ul>) with list items (<li>) that contain links (<a>).
- This section contains navigation links that allow users to navigate to other pages. It includes an unordered list (
<footer>:- Contains footer content, typically used for copyright information, contact details, or links. In this case, it includes a simple paragraph stating "My HTML Practice Page."
  <!DOCTYPE html>
  <html lang="en">
  <head>
      <meta charset="UTF-8">
      <meta name="viewport" content="width=device-width, initial-scale=1.0">
      <title>HTML Elements Practice</title>
  </head>
  <body>
      <header>
          <h1>Welcome to My HTML Elements Practice</h1>
          <h2>Exploring Different Heading Levels</h2>
          <h3>This is a Subheading</h3>
          <h4>Further Subheading</h4>
          <h5>Another Sublevel Heading</h5>
          <h6>Lowest Heading Level</h6>

          <nav>
              <ul>
                  <li><a href="caldalink1.html">Calda-Link 1</a></li>
                  <li><a href="caldalink2.html">Calda-Link 2</a></li>
                  <li><a href="caldalink3.html">Calda-Link 3</a></li>
              </ul>
          </nav>
      </header>

      <footer>
          <p>My HTML Practice Page.</p>
      </footer>
  </body>
  </html>
caldalink1.html:
<!DOCTYPE html>:- This declaration indicates that the document is written in HTML5, which helps the browser understand how to render the content correctly.
<html lang="en">:- The
<html>tag is the root element of the HTML document. Thelangattribute specifies the language of the content, which is English (en). This is important for accessibility tools, such as screen readers, and for search engine optimization.
- The
<head>Section:This section contains meta-information about the document that is not displayed directly on the web page.
<meta charset="UTF-8">: Specifies the character encoding for the document, allowing for a wide variety of characters and symbols to be displayed properly.<meta name="viewport" content="width=device-width, initial-scale=1.0">: Ensures the page is responsive by setting the viewport width to the device’s width, allowing for proper scaling on mobile devices.<title>Headings and Paragraphs Example</title>: This sets the title of the document, which appears in the browser tab and is important for users and search engines.
<body>Section:- This section contains all the content that will be visible on the web page.
<section id="caldalink1">:- The
<section>element groups related content together, and theidattribute provides a unique identifier that can be used for navigation or styling (if CSS were applied).
- The
<article>:- The
<article>tag represents a self-contained piece of content that could stand alone. This is appropriate here as it contains related headings and paragraphs.
- The
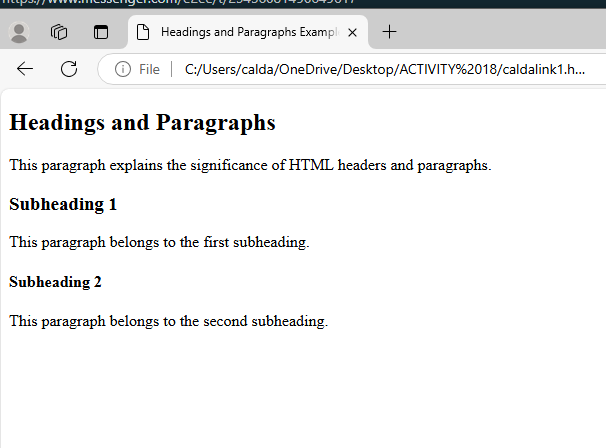
Headings and Paragraphs:
<h2>Headings and Paragraphs</h2>: This is a second-level heading that introduces the main topic of the article. Headings help to organize content hierarchically.<p>This paragraph explains the significance of HTML headers and paragraphs.</p>: This paragraph provides an explanation of the importance of headings and paragraphs in HTML, indicating their role in structuring content.<h3>Subheading 1</h3>: This is a third-level heading that introduces a specific subtopic related to the main topic.<p>This paragraph belongs to the first subheading.</p>: This paragraph elaborates on the content related to "Subheading 1," providing additional information.<h4>Subheading 2</h4>: This is a fourth-level heading that introduces another subtopic under the main topic.<p>This paragraph belongs to the second subheading.</p>: This paragraph provides information relevant to "Subheading 2," further explaining the content structure.
<!DOCTYPE html>
<html lang="en">
<head>
    <meta charset="UTF-8">
    <meta name="viewport" content="width=device-width, initial-scale=1.0">
    <title>Headings and Paragraphs Example</title>
</head>
<body>

    <section id="caldalink1">
        <article>
            <h2>Headings and Paragraphs</h2>
            <p>This paragraph explains the significance of HTML headers and paragraphs.</p>

            <h3>Subheading 1</h3>
            <p>This paragraph belongs to the first subheading.</p>

            <h4>Subheading 2</h4>
            <p>This paragraph belongs to the second subheading.</p>
        </article>
    </section>

</body>
</html>
caldalink2.html:
<!DOCTYPE html>:- This declaration informs the browser that the document is an HTML5 document, ensuring that the content is rendered correctly.
<html lang="en">:- The
<html>tag serves as the root element of the document. Thelangattribute specifies the primary language of the content as English (en), which is useful for accessibility and search engine optimization.
- The
<head>Section:The
<head>section contains meta-information about the document that is not displayed directly on the webpage.<meta charset="UTF-8">: This specifies the character encoding for the document, allowing for the representation of a wide range of characters and symbols.<meta name="viewport" content="width=device-width, initial-scale=1.0">: This ensures that the page is responsive by setting the viewport width to the device’s width, allowing for proper scaling on mobile devices.<title>HTML Lists and Table Example</title>: This sets the title of the document, which appears in the browser tab and is essential for user navigation and search engine indexing.
<body>Section:- The
<body>section contains all the visible content on the webpage.
- The
<header>:This element serves as the introductory content for the page, containing a main heading.
<h1>HTML Examples: Lists and Tables</h1>: This is the primary heading of the document, indicating that the content will focus on examples of lists and tables in HTML.
<section id="caldalink2">:- The
<section>element groups related content together. Theidattribute provides a unique identifier, which could be used for navigation or styling.
- The
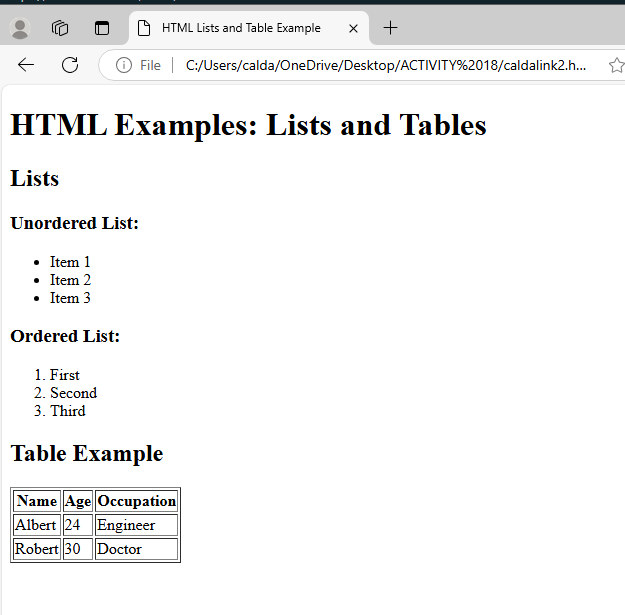
First
<article>for Lists:<article>: Represents a self-contained piece of content. This article focuses on the topic of lists.Inner
<header>:<h2>Lists</h2>: This second-level heading introduces the section about lists.
Unordered List Section:
<h3>Unordered List:</h3>: This third-level heading introduces an unordered list.<ul>: This tag represents an unordered list, with bullet points for each item.<li>Item 1</li>,<li>Item 2</li>,<li>Item 3</li>: Each<li>tag represents an individual list item.
Ordered List Section:
<h3>Ordered List:</h3>: This heading introduces an ordered list.<ol>: This tag represents an ordered list, with numbered items.<li>First</li>,<li>Second</li>,<li>Third</li>: Each<li>tag within the<ol>represents an individual list item.
Second
<article>for Table Example:This article focuses on presenting tabular data.
Inner
<header>:<h2>Table Example</h2>: This heading introduces the section about tables.
<table border="1">: This tag creates a table, with theborderattribute specifying the width of the table border.<thead>: This section defines the header of the table.<tr>: Represents a table row, which contains header cells.<th>Name</th>,<th>Age</th>,<th>Occupation</th>: Each<th>tag defines a header cell within the row, indicating the type of data in each column.
<tbody>: This section contains the body of the table, which holds the actual data.First Data Row:
<tr>: Represents a row in the table body.<td>Albert</td>,<td>24</td>,<td>Engineer</td>: Each<td>tag defines a standard cell containing data for each column in the row.
Second Data Row:
<tr>: Another row in the table body.<td>Robert</td>,<td>30</td>,<td>Doctor</td>: Standard cells for the second row of data.
<!DOCTYPE html>
<html lang="en">
<head>
    <meta charset="UTF-8">
    <meta name="viewport" content="width=device-width, initial-scale=1.0">
    <title>HTML Lists and Table Example</title>
</head>
<body>

    <header>
        <h1>HTML Examples: Lists and Tables</h1>
    </header>

    <section id="caldalink2">
        <article>
            <header>
                <h2>Lists</h2>
            </header>
            <section>
                <h3>Unordered List:</h3>
                <ul>
                    <li>Item 1</li>
                    <li>Item 2</li>
                    <li>Item 3</li>
                </ul>
            </section>
            <section>
                <h3>Ordered List:</h3>
                <ol>
                    <li>First</li>
                    <li>Second</li>
                    <li>Third</li>
                </ol>
            </section>
        </article>

        <article>
            <header>
                <h2>Table Example</h2>
            </header>
            <table border="1">
                <thead>
                    <tr>
                        <th>Name</th>
                        <th>Age</th>
                        <th>Occupation</th>
                    </tr>
                </thead>
                <tbody>
                    <tr>
                        <td>Albert</td>
                        <td>24</td>
                        <td>Engineer</td>
                    </tr>
                    <tr>
                        <td>Robert</td>
                        <td>30</td>
                        <td>Doctor</td>
                    </tr>
                </tbody>
            </table>
        </article>
    </section>

</body>
</html>
caldalink3.html:
Form Example:
<article>: Contains the form for user input.<h2>Form Example:</h2>: This heading introduces the form section.<form>: This tag defines the form.<label for="name">Name:</label>: A label for the name input field.<input type="text" id="name" name="name" placeholder="Enter your name">: A text input for the user's name with a placeholder.<label for="email">Email:</label>: A label for the email input field.<input type="email" id="email" name="email" placeholder="Enter your email">: An email input field with a placeholder.<button type="submit">Submit</button>: A button to submit the form.
    <article>
                    <h2>Form Example:</h2>
                    <form>
                        <label for="name">Name:</label><br>
                        <input type="text" id="name" name="name" placeholder="Enter your name"><br><br>

                        <label for="email">Email:</label><br>
                        <input type="email" id="email" name="email" placeholder="Enter your email"><br><br>

                        <button type="submit">Submit</button>
                    </form>
                </article>
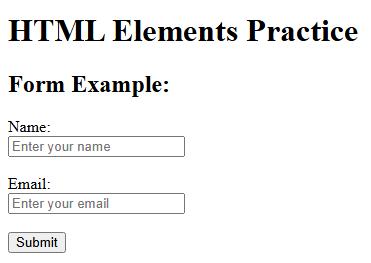
Image Example:
<h2>Image Example</h2>: This heading introduces the image section.<figure>: This tag groups the image and its caption.<img src="https://via.placeholder.com/150" alt="Sample Image">: An image from a placeholder URL with an alternative text.<figcaption>This is a placeholder image</figcaption>: A caption describing the image.
  article>
                  <h2>Image Example</h2>
                  <figure>
                      <img src="https://via.placeholder.com/150" alt="Sample Image">
                      <figcaption>This is a placeholder image</figcaption>
                  </figure>
              </article>
Canvas Example:
<h2>Canvas Example</h2>: This heading introduces the canvas section.<canvas id="myCanvas" width="200" height="100"></canvas>: A canvas element for drawing graphics.<article> <h2>Canvas Example</h2> <canvas id="myCanvas" width="200" height="100"></canvas> <script> const canvas = document.getElementById("myCanvas"); const ctx = canvas.getContext("2d"); ctx.fillStyle = "violet"; ctx.fillRect(20, 20, 150, 75); </script> </article>
Video Example:
<h2>Video Example</h2>: This heading introduces the video section.<video width="320" height="240" controls>: A video element that allows playback controls.<source src="movie.mp4" type="video/mp4">: Specifies the video file source.Fallback Text: Displays if the browser does not support the video tag.
    <article>
                    <h2>Video Example</h2>
                    <video width="320" height="240" controls>
                        <source src="movie.mp4" type="video/mp4">
                        Your browser does not support the video tag.
                    </video>
                </article>
YouTube Video Example:
<h2>YouTube Video Example</h2>: This heading introduces the YouTube video section.<iframe>: Embeds a YouTube video.- The
srcattribute contains the URL of the YouTube video, andallowfullscreenenables full-screen mode.
- The
     <article>
                    <h2>YouTube Video Example</h2>
                    <iframe width="560" height="315"
                            src="https://www.youtube.com/embed/dQw4w9WgXcQ"
                            frameborder="0" allow="autoplay; encrypted-media" allowfullscreen>
                    </iframe>
                </article>
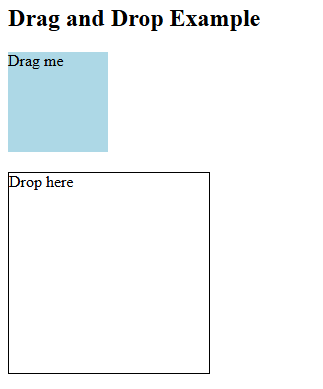
Drag and Drop Example:
<h2>Drag and Drop Example</h2>: This heading introduces the drag-and-drop section.Draggable Element:
<div id="drag1" draggable="true" ondragstart="drag(event)" style="width:100px;height:100px;background-color:lightblue;">Drag me</div>: A draggable div.
Drop Zone:
<div id="dropZone" ondrop="drop(event)" ondragover="allowDrop(event)" style="width:200px;height:200px;border:1px solid black;margin-top:20px;">Drop here</div>: A designated area to drop the draggable element.
    <article>
                    <h2>Drag and Drop Example</h2>
                    <div id="drag1" draggable="true" ondragstart="drag(event)"
                         style="width:100px;height:100px;background-color:lightblue;">
                        Drag me
                    </div>

                    <div id="dropZone" ondrop="drop(event)" ondragover="allowDrop(event)"
                         style="width:200px;height:200px;border:1px solid black;margin-top:20px;">
                        Drop here
                    </div>

                    <script>
                        function allowDrop(event) {
                            event.preventDefault();
                        }

                        function drag(event) {
                            event.dataTransfer.setData("text", event.target.id);
                        }

                        function drop(event) {
                            event.preventDefault();
                            const data = event.dataTransfer.getData("text");
                            event.target.appendChild(document.getElementById(data));
                        }
                    </script>
                </article>
caldalink3.html full src code:
```html <!DOCTYPE html> HTML Elements Example
HTML Elements Practice
Form Example:
Name:Email:
Submit
Image Example
Canvas Example
Video Example
Your browser does not support the video tag.YouTube Video Example
Drag and Drop Example
```